


In this current market, finding a job that suits you is Super Hard!
Recently, I was exploring the OpenAI Agents SDK and building MCP agents and agentic Workflows.
To implement my learnings, I thought, why not solve a real, common problem?
So I built this multi-agent job search workflow that finds jobs that suit me!
In this Article, I'll show you how you can build this Agent Workflow!
Let's START!
How the Job Searching Agent Works
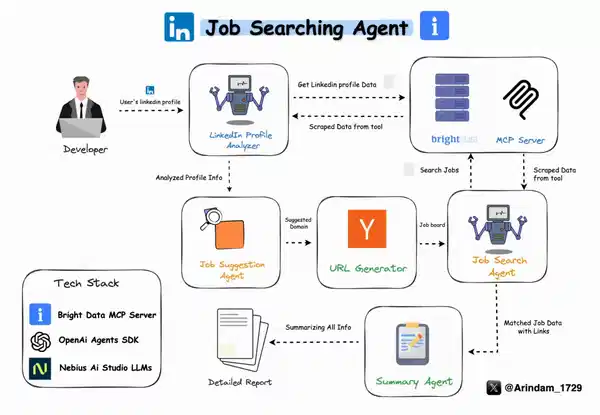
Before moving forward, let's understand how our Workflow Agent works!
- First, the User Provides their LinkedIn Profile
- The first agent analyzes your profile, your experience, skills, and career path using BrightData's MCP Server.
- Based on the Analysis, it predicts a domain that matches your interest & experience
- Then it scrapes the Y Combinator job board for current openings using BrightData's MCP server
- Finally, it generates a detailed report with your profile summary + a list of top job matches tailored to you.
I've used separate agents for each of these tasks.
Yes, I could’ve clubbed a few together… but from my experiments, that just made the agents confused and increased hallucinations.🙃
If You prefer Video more, you can watch this:👇🏼
Tools I Used
Here are the main tools I used to build this project.
I was looking for simple and reliable options, and these turned out to be perfect for the job.
1. Nebius AI Studio
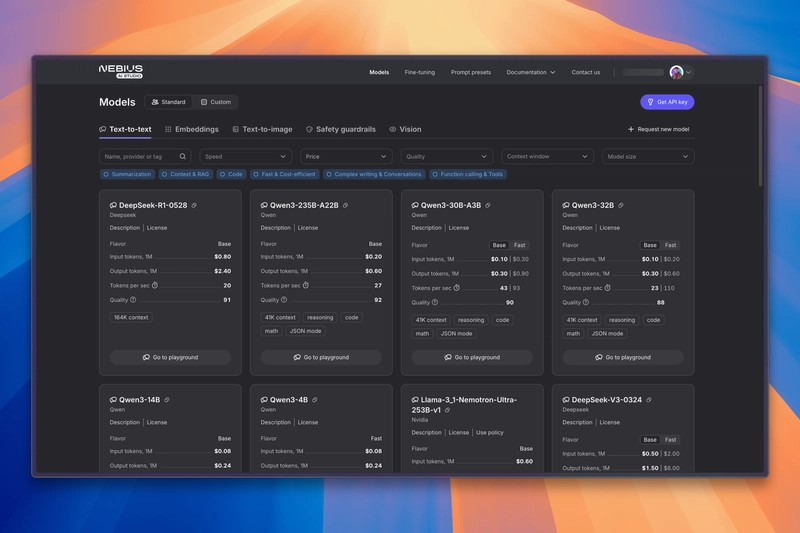
I was looking for a budget-friendly way to run LLMs multiple times in a single workflow, without worrying too much about cost or performance.
That’s when I found Nebius AI Studio.
It lets you run open-source AI models easily, and the performance was great for what I needed. It’s fast, affordable, and works really well if you want to use powerful models without spending a lot.
2. BrightData's MCP Server

One big limitation of LLMs? They usually don’t have live access to real-time data.
MCP fixes this issue by giving LLMs access to external tools.
For this project, I used Bright Data’s MCP (Model Context Protocol) Server.
I found it while looking for ways to give my agent internet access. With this MCP server, our agent can:
- Search and browse websites
- Get around location blocks or CAPTCHAs
- Scrape data without getting blocked
It worked perfectly for this project, where I needed real-time info from the web.
Check out BrightData's MCP Server
3. OpenAI Agents SDK
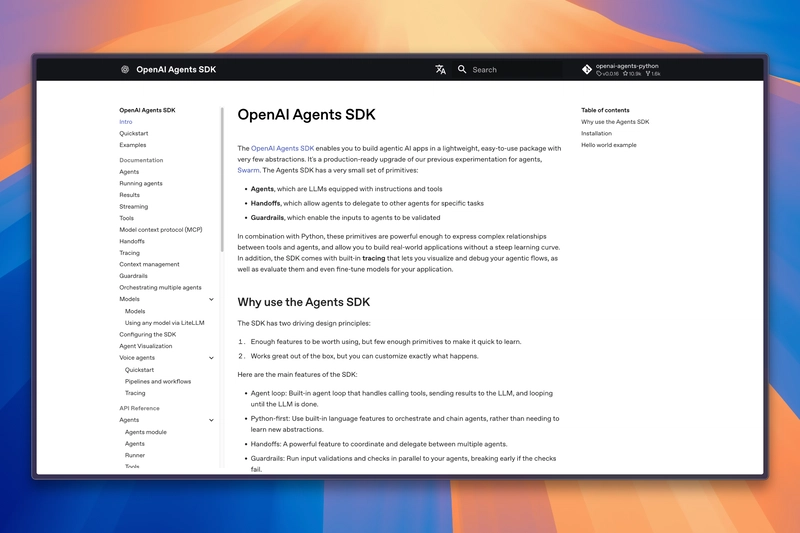
Since I was already exploring the OpenAI Agents SDK and learning how to build MCP agents and agentic workflows, I decided to use it as the foundation for this project.
I found it to be super simple and flexible, exactly what I needed for creating a multi-agent setup that could actually solve a real-world task like job hunting.
It’s a lightweight tool that helps you create agent-based apps easily. With this, I could:
- Give instructions and tools to my LLM
- Let agents pass work to each other
- Add basic checks before sending data to the model
It’s super useful if you're building multi-step or multi-agent apps.
4. Streamlit for UI

Lastly, I needed a quick and clean way to build the UI.
As a Python dev, Streamlit was the obvious choice.
For Python Devs, Streamlit is the go-to option for building an intuitive UI for their applications.
Just a few lines, and I had a fully functional dashboard where I could enter a LinkedIn URL and run the workflow.
It made the whole process really easy.
Building the Job Searching Agent
Enough talking, let's start building the Agent!🔥
Pre-requisites
Before running this project, make sure you have:
- Python 3.10 or higher
- A Bright Data account and API credentials
- Nebius AI Studio account and API key
Project Structure
To keep things clean and modular, we’ve organized the project like this:
# Folder Structure 👇🏼

job_finder_agent/
├── app.py              # Streamlit web interface
├── job_agents.py       # AI agent definitions and analysis logic
├── mcp_server.py       # Bright Data MCP server management
├── requirements.txt    # Python dependencies
├── assets/            # Static assets (images, GIFs)
└── .env              # Environment variables (create this)
Here’s a quick breakdown:
-
app.py: The entry point for the Streamlit app. This is where users interact with the tool. -
job_agents.py: Contains all agent-related logic and workflow. -
mcp_server.py: Initialize MCP Server. - assets/: Holds any visuals or media used in the UI.
-
.env: Stores sensitive data like API keys, make sure this file is included in your.gitignore.
With this structure, it’s super easy to debug, extend, or even plug in new agents later on.
Creating the Agents 🤖
First, we'll create the Agents needed for our project. For that, let's go to the job_agents.py file.
Here, we'll import the required Modules:
# job_agents.py 👇🏼

import os
import logging
import asyncio
from agents import (
    Agent,
    OpenAIChatCompletionsModel,
    Runner,
    set_tracing_disabled,
)
from agents.mcp import MCPServer
from openai import AsyncOpenAI


logger = logging.getLogger(__name__)
We will now define an async function run_analysis that starts the entire agent workflow.
async def run_analysis(mcp_server: MCPServer, linkedin_url: str):

    logger.info(f"Starting analysis for LinkedIn URL: {linkedin_url}")
    api_key = os.environ["NEBIUS_API_KEY"]
    base_url = "https://api.studio.nebius.ai/v1"
    client = AsyncOpenAI(base_url=base_url, api_key=api_key)
    set_tracing_disabled(disabled=True)
This is our first and one of the most critical agents. It analyzes the user's LinkedIn profile to extract relevant career insights.
linkedin_agent = Agent(
        name="LinkedIn Profile Analyzer",
        instructions=f"""You are a LinkedIn profile analyzer.
        Analyze profiles for:

        - Professional experience and career progression
        - Education and certifications
        - Core skills and expertise
        - Current role and company
        - Previous roles and achievements
        - Industry reputation (recommendations/endorsements)

        Provide a structured analysis with bullet points and a brief executive summary.
        """,
        mcp_servers=[mcp_server],
        model=OpenAIChatCompletionsModel(
            model="meta-llama/Llama-3.3-70B-Instruct",
            openai_client=client
        )
    )
💡 Note: This agent does use the mcp_server, as it pulls in data from LinkedIn using BrightData's scraping engine.
Now that we’ve analyzed the profile, we need to predict which domain the user fits best in.
The Job Suggestion agent that will suggest the preferred domain of the user based on the Analysis of the previous Agent
job_suggestions_agent = Agent(
        name="Job Suggestions",
        instructions=f"""You are a domain classifier that identifies the primary professional domain from a LinkedIn profile.
        """,
        model=OpenAIChatCompletionsModel(
            model="meta-llama/Llama-3.3-70B-Instruct",
            openai_client=client
        )
    )
💡 Note: Here, we haven't used MCP Tools as it's not doing any function calls.
Then, we'll create a Job board URL generator. This agent takes the domain and builds the URL for the Y Combinator job board.
url_generator_agent = Agent(
        name="URL Generator",
        instructions=f"""You are a URL generator that creates Y Combinator job board URLs based on domains.
        """,
        model=OpenAIChatCompletionsModel(
            model="meta-llama/Llama-3.3-70B-Instruct",
            openai_client=client
        )
    )
Next up, We're Building the Job Search Agent. This agent will visit the generated URL and pull out real job listings.
Job_search_agent = Agent(
        name="Job Finder",
        instructions=f"""You are a job finder that extracts job listings from Y Combinator's job board.
        """,
        mcp_servers=[mcp_server],
        model=OpenAIChatCompletionsModel(
            model="meta-llama/Llama-3.3-70B-Instruct",
            openai_client=client
        )
    )
💡 Note: This agent uses the MCP server again, because it needs to make live scraping calls to YC's job board.
Sometimes YC job links are behind authentication redirects 🤷🏻♂️. This agent cleans up and simplifies those URLs.
You can skip this agent if you're using job boards that don’t require cleanup.
url_parser_agent = Agent(
        name="URL Parser",
        instructions=f"""You are a URL parser that transforms Y Combinator authentication URLs into direct job URLs.
        """,
        model=OpenAIChatCompletionsModel(
            model="meta-llama/Llama-3.3-70B-Instruct",
            openai_client=client
        )
    )
Finally, we'll bring everything together. This agent summarizes the user’s profile, the domain prediction, and the job results into a clean markdown report.
summary_agent = Agent(
        name="Summary Agent",
        instructions=f"""You are a summary agent that creates comprehensive career analysis reports.

        Ensure your response is well-formatted markdown that can be directly displayed.""",
        model=OpenAIChatCompletionsModel(
            model="meta-llama/Llama-3.3-70B-Instruct",
            openai_client=client
        )
    )
It creates a report that looks clean in Streamlit or even markdown renderers, so you can easily share it or save it for later!😉
Creating the Workflow
Now that all agents are ready, let’s build the actual flow that connects them in a logical sequence.
In the Agents SDK, to create a workflow, you have to pass the result of the previous agent as the input and specify the starting_agent as the agent who’ll handle the current task.
Here’s what it looks like in code:
# Get LinkedIn profile analysis
        logger.info("Running LinkedIn profile analysis")
        linkedin_result = await Runner.run(starting_agent=linkedin_agent, input=query)
        logger.info("LinkedIn profile analysis completed")

        # Get job suggestions
        logger.info("Getting job suggestions")
        suggestions_result = await Runner.run(starting_agent=job_suggestions_agent, input=linkedin_result.final_output)
        logger.info("Job suggestions completed")

        # Get specific job matches
        logger.info("Getting job link")
        job_link_result = await Runner.run(starting_agent=url_generator_agent, input=suggestions_result.final_output)
        logger.info("Job link generation completed")

        # Get job matches
        logger.info("Getting job matches")
        job_search_result = await Runner.run(starting_agent=Job_search_agent, input=job_link_result.final_output)
        logger.info("Job search completed")

        # Parse URLs to get direct job links
        logger.info("Parsing job URLs")
        parsed_urls_result = await Runner.run(starting_agent=url_parser_agent, input=job_search_result.final_output)
        logger.info("URL parsing completed")

        # Create a single input for the summary agent
        logger.info("Generating final summary")
        summary_input = f"""LinkedIn Profile Analysis:
        {linkedin_result.final_output}

        Job Suggestions:
        {suggestions_result.final_output}

        Job Matches:
        {parsed_urls_result.final_output}

        Please analyze the above information and create a comprehensive career analysis report in markdown format."""

        # Get final summary with a single call
        summary_result = await Runner.run(starting_agent=summary_agent, input=summary_input)
        logger.info("Summary generation completed")
        return summary_result.final_output
Initializing the MCP server
Now, we'll initialize our MCP server!
We’ll start by creating a mcp_server.py file, which will handle all things related to setting up and accessing the MCP server.
First, we import the essential modules, including asyncio for handling async logic, and MCPServerStdio from the Agents SDK:
import os
import logging
import asyncio
from agents.mcp import MCPServerStdio

logger = logging.getLogger(__name__)
_mcp_server = None
Next we'll create the initializemcpserver fn that will initialize the mcp server with the credentials
async def initialize_mcp_server():
    """Initialize MCP server."""
    global _mcp_server

    if _mcp_server:
        return _mcp_server

    try:
        server = MCPServerStdio(
            cache_tools_list=False,
            params={
                "command": "npx",
                "args": ["-y", "@brightdata/mcp"],
                "env": {
                    "API_TOKEN": os.environ["BRIGHT_DATA_API_KEY"],
                    "WEB_UNLOCKER_ZONE": "mcp_unlocker",
                    "BROWSER_AUTH": os.environ["BROWSER_AUTH"],
                }
            }
        )

        await asyncio.wait_for(server.__aenter__(), timeout=10)
        _mcp_server = server
        return server

    except Exception as e:
        logger.error(f"Error initializing MCP server: {e}")
        return None
💡 Note: Make sure you've set your environment variables (BRIGHT_DATA_API_KEY, BROWSER_AUTH) properly in your .env, otherwise the server will fail to boot.
This function does a few important things:
- Prevents re-initialization if the server is already up.
- Spins up a new MCP server instance.
- Handles timeout and logs any failure gracefully.
To keep things clean, we add two utility functions:
- One to wait until the server is ready (wait_for_initialization)
- Another to retrieve the server instance (get_mcp_server)
Here they are:
async def wait_for_initialization():
    """Wait for MCP initialization to complete."""
    return await initialize_mcp_server() is not None

def get_mcp_server():
    """Get the current MCP server instance."""
    return _mcp_server
Creating Streamlit UI
Finally, we'll assemble everything and create our UI for this Agent using Streamlit.
First things first, we import all the necessary modules and set up our Streamlit app configuration
import streamlit as st
import asyncio
import os
import logging
import nest_asyncio
import base64
from dotenv import load_dotenv
from job_agents import run_analysis
from mcp_server import wait_for_initialization, get_mcp_server

nest_asyncio.apply()
load_dotenv()

logger = logging.getLogger(__name__)

# Set page config
st.set_page_config(
    page_title="LinkedIn Profile Analyzer",
    page_icon="🔍",
    layout="wide"
)
Next, we will use asyncio to asynchronously call our run_analysis() function once the MCP server is initialized.
This function is triggered when a user clicks the "Analyze Profile" button.
# Initialize session state
if 'analysis_result' not in st.session_state:
    st.session_state.analysis_result = ""
if 'is_analyzing' not in st.session_state:
    st.session_state.is_analyzing = False

async def analyze_profile(linkedin_url: str):
    try:
        if not await wait_for_initialization():
            st.error("Failed to initialize MCP server")
            return

        result = await run_analysis(get_mcp_server(), linkedin_url)
        st.session_state.analysis_result = result
    except Exception as e:
        logger.error(f"Error analyzing LinkedIn profile: {str(e)}")
        st.error(f"Error analyzing LinkedIn profile: {str(e)}")
    finally:
        st.session_state.is_analyzing = False
We have also initialized some session state variables to manage app status between interactions.
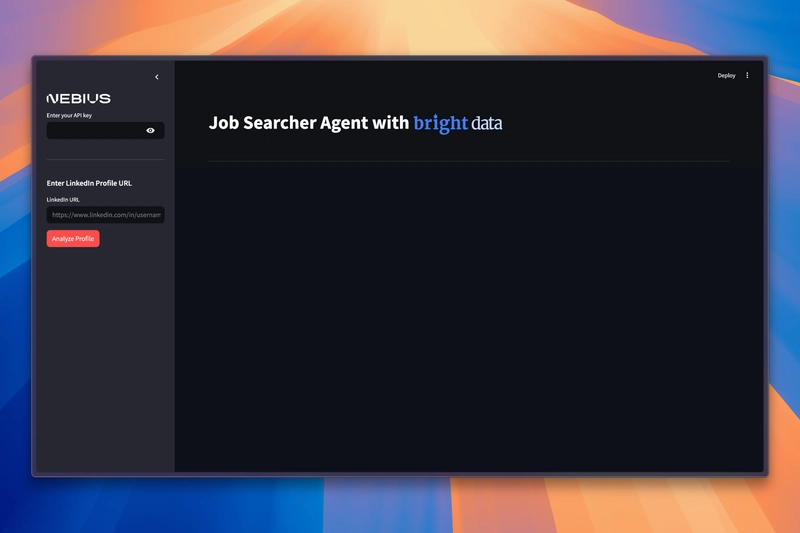
Now for the fun part, ie, the main UI 🤩! We'll create a Simple UI to interact with our Agents
def main():
# Load and encode images
with open("./assets/bright-data-logo.png", "rb") as bright_data_file:
bright_data_base64 = base64.b64encode(bright_data_file.read()).decode()
# Create title with embedded images
title_html = f"""
<div style="display: flex; align-items: center; gap: 0px; margin: 0; padding: 0;">
<h1 style="margin: 0; padding: 0;">
Job Searcher Agent with
<img src="data:image/png;base64,{bright_data_base64}" style="height: 110px; margin: 0; padding: 0;"/>
</h1>
</div>
"""
st.markdown(title_html, unsafe_allow_html=True)
st.markdown("---")
# Sidebar
with st.sidebar:
st.image("./assets/Nebius.png", width=150)
api_key = st.text_input("Enter your API key", type="password")
st.divider()
st.subheader("Enter LinkedIn Profile URL")
linkedin_url = st.text_input("LinkedIn URL", placeholder="https://www.linkedin.com/in/username/")
if st.button("Analyze Profile", type="primary", disabled=st.session_state.is_analyzing):
if not linkedin_url:
st.error("Please enter a LinkedIn profile URL")
return
if not api_key:
st.error("Please enter your API key")
return
st.session_state.is_analyzing = True
st.session_state.analysis_result = ""
loop = asyncio.new_event_loop()
asyncio.set_event_loop(loop)
try:
loop.run_until_complete(analyze_profile(linkedin_url))
finally:
loop.close()
# Results section
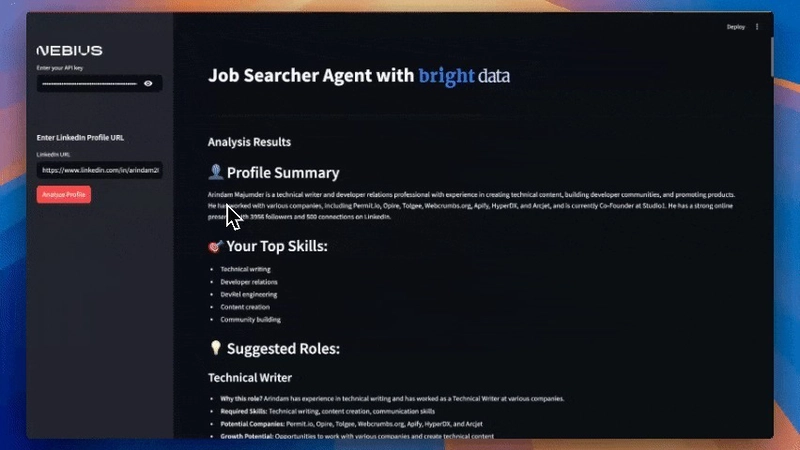
if st.session_state.analysis_result:
st.subheader("Analysis Results")
st.markdown(st.session_state.analysis_result)
# Loading state
if st.session_state.is_analyzing:
st.markdown("---")
with st.spinner("Analyzing profile... This may take a few minutes."):
st.empty()
if __name__ == "__main__":
main()
That's It! We now have a fully functional Streamlit UI connected to a multi-agent AI system with browser automation and scraping via MCP.
Running this Locally:
Now that everything's set up, let’s get this app running locally!
First we'll create a virtual environment:
python -m venv venv
source venv/bin/activate  # On Windows, use: venv\Scripts\activate
Next, install all the required packages listed in requirements.txt:
pip install -r requirements.txt
Finally, Run the Application:
streamlit run app.py
Now go to http://localhost:8501:
Our Agent is ready to analyze LinkedIn profiles and find job matches like magic.🪄
That’s it! 🎉
We've successfully built a multi-agent workflow that finds jobs for us using the MCP server.
You'll find the Full Code Here: Github Repo
If you found this article useful, share it with your peers
Also, Follow me For More Content like this:

For Paid collaboration, mail me at: arindammajumder2020@gmail.com.
Thank you for Reading!


Templates let you quickly answer FAQs or store snippets for re-use.